“Transform your garage into a dry, durable oasis with American Concrete Surfaces Waterproof Garage Floor Epoxy. This comprehensive guide navigates the world of garage floor epoxy installation, from understanding the basics to choosing the perfect formula. Learn key preparation steps, application techniques, and curing time considerations for optimal results. Discover how to maintain your waterproof surface long-term. Elevate your space with this durable, low-maintenance solution – dive into the details on garage floor epoxy installation today.”
- Understanding Garage Floor Epoxy Basics
- Preparation: Key Steps Before Installation
- Choosing the Right Epoxy Formula
- Application Techniques for Optimal Results
- Curing and Drying Time Considerations
- Maintaining Your Waterproof Garage Floor
Understanding Garage Floor Epoxy Basics
Garage floor epoxy installation is a popular choice for homeowners and businesses looking to transform their concrete surfaces into durable and attractive spaces. At its core, garage floor epoxy involves applying a two-part coating—a resin and a hardener—to the concrete, which then chemically bonds to create a robust, protective layer. This process offers far more than just water resistance; it provides an array of decorative garage floor solutions while enhancing the surface’s strength and longevity.
For those considering concrete garage floor resurfacing, epoxy presents numerous advantages. Its chemical resistance makes it ideal for environments prone to spills or exposure to harsh substances, making it a top pick for workshops, garages, and industrial settings. Moreover, epoxy coatings can be customized to suit various aesthetic preferences, from sleek, high-gloss finishes to textured, matte looks, ensuring that your garage floor not only serves its practical purpose but also adds to the overall appeal of your space.
Preparation: Key Steps Before Installation
Before installing American Concrete Surfaces Waterproof Garage Floor Epoxy, several key preparation steps are essential to ensure optimal results. Start by thoroughly cleaning the concrete surface using a degreasing agent and hot water to remove any dirt, grease, or oils that could impede adhesion. Next, inspect the floor for cracks, holes, or uneven spots, repairing these issues with concrete patching compound to create a smooth, level base.
Moisture testing is another crucial step in the preparation process, as excessive moisture can lead to epoxy failure. Use a moisture meter to ensure the concrete is dry enough—typically below 3% moisture content. Lastly, if necessary, apply an appropriate primer designed for garage floor epoxy systems, enhancing adhesion and providing added protection against chemical spills and stains, especially with a chemical-resistant garage epoxy coating.
Choosing the Right Epoxy Formula
When considering a garage floor epoxy installation, selecting the appropriate formula is paramount to achieving both durability and aesthetics. The market offers a wide array of options tailored for specific needs, from basic protective coatings to advanced decorative solutions. For optimal results, understand your requirements beforehand. If slip resistance is a priority, opt for an epoxy with added grit or texturing agents. Chemical-resistant garage epoxy is ideal for workshops or spaces dealing with hazardous substances, ensuring surfaces can withstand exposure without damage.
Decorative garage floor solutions are not just about aesthetics; they can enhance the overall value of your property. Formulas incorporating specialized pigments allow for custom colors and intricate designs. However, ensure these options meet industry standards for strength and adhesion to avoid long-term issues. The right choice will transform your garage from a functional space into a visually appealing area that can withstand various demands, be it heavy traffic or harsh chemicals.
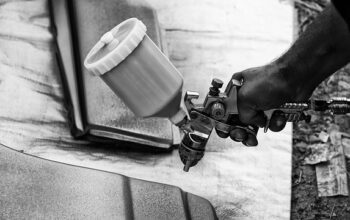
Application Techniques for Optimal Results
For optimal results with American Concrete Surfaces Waterproof Garage Floor Epoxy, understanding and employing the correct application techniques is key. The process begins with thorough cleaning to remove any grease, oil, or debris from the concrete surface, ensuring a clean canvas for the epoxy to adhere to effectively. This initial step is crucial for achieving long-lasting durability.
After cleaning, concrete garage floor resurfacing involves preparing the surface by slightly roughening it, creating a profile that enhances epoxy bonding. Next, applying the decorative garage floor solutions or chemical resistant garage epoxy involves careful mixing and spreading to achieve an even coat. Multiple thin layers are often better than one thick layer, promoting better coverage and curing. This method also helps in hiding any minor imperfections in the concrete.
Curing and Drying Time Considerations
The curing and drying time for a garage floor epoxy installation is a crucial factor in achieving optimal results. After application, the epoxy needs sufficient time to set and harden properly. This process typically takes anywhere from 24 to 72 hours, depending on environmental conditions and the specific product used. During this time, it’s essential to maintain an adequate temperature range (typically between 50°F and 90°F or 10°C to 32°C) and minimize foot traffic to allow the epoxy to cure evenly.
Proper ventilation is also necessary to prevent excessive moisture buildup, which can impede the curing process. Once cured, the floor should be allowed to dry thoroughly before applying any additional coatings or finishes, such as decorative garage floor solutions or waterproof garage floor coatings. Following the recommended drying time ensures a durable and long-lasting surface that can withstand heavy traffic and exposure to various chemicals commonly found in garages.
Maintaining Your Waterproof Garage Floor
Maintaining a waterproof garage floor isn’t as complex as it may seem. After the successful installation of garage floor epoxy, regular cleaning and inspection are key to preserving its longevity. Start by sweeping or vacuuming your floor to remove any dust, dirt, or debris that might accumulate over time. Avoid using harsh chemicals or abrasive cleaners, as these can damage the epoxy’s surface. A mild detergent mixed with warm water is usually sufficient for everyday cleaning.
For more stubborn stains or marks, consider a combination of white vinegar and water in equal parts. Apply this solution with a soft cloth or sponge and gently scrub the affected area. Once cleaned, wipe down the floor with a damp cloth to ensure no residue is left behind. Additionally, checking for signs of wear or moisture intrusion on a regular basis is crucial. Promptly address any issues to prevent further damage and maintain the effectiveness of your waterproof garage floor coatings, ensuring both durability and slip-resistant properties over time.
American Concrete Surfaces water-proof garage floor epoxy offers a durable and stylish solution for your garage. By understanding the basics, preparing your surface thoroughly, selecting the right formula, and mastering application techniques, you can achieve optimal results. Proper curing and drying times ensure long-lasting protection, while regular maintenance keeps your garage floor looking its best. For an efficient and successful garage floor epoxy installation, follow these expert guidelines.